How To Setup Pecha Kucha Powerpoint For Mac
What’s that?
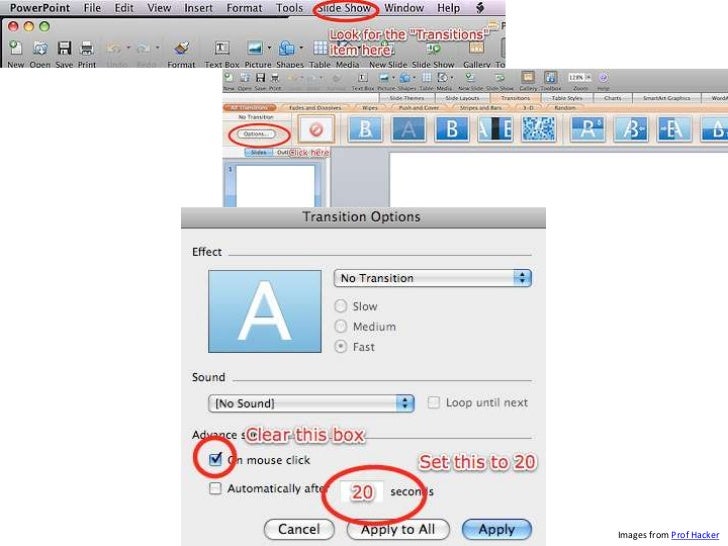
Feb 07, 2018 Pecha Kucha PowerPoint Setup. How to prepare 20s PowerPoint slides for Pecha Kucha. Pecha Kucha it´s the art of concise presentation. 20x20 means 20 images for 20 seconds each. In total the. Designers worldwide are resurrecting the slideshow and trying to elevate it to a form of poetry in a new movement called Pecha Kucha, an open-mic night for creative types to show off their projects. And the business world is starting to pay attention. Born in Japan, Pecha Kucha has two simple rules.
Pecha Kucha is a presentation format that gives you 20 slides that display for 20 seconds each. So the entire presentation is 6 minutes and 40 seconds. You have no control over the timing; it is all set up automatically in advance. I explain more about pecha kucha and how to set it up here.
Someone in my small hometown (actually he was a student of mine who took one of my workshops) organized it. You can read more about the Fairfield, Iowa Pecha Kucha group and about the International organization here.
Our town has a monthly Friday Art Walk and the Pecha Kucha event was part of it. I was invited to be the first speaker at the first event. My talk was called “Slide Design for the Artistically Challenged.” Pecha Kucha’s history has lead it to be favored by artists and I wanted to give the audience the confidence that although they would see some awe-inspiring slides, they could also design great slides — even if they felt they were artistically challenged. About 30% of the audience raised their hands when I asked if they felt they were artistically challenged.
Here are the 20 slides that I used.
Tips for a successful Pecha Kucha event
Because the format is so tightly structured, you need to plan in advance what you’re going to say for each slide. Then, you need to practice! I probably practiced my presentation about 15 times before I felt comfortable. You don’t want to get ahead or behind because those slides just keep coming every 20 seconds!
Adobe photoshop cc crack amtlib for mac. From my own experience and watching the other speakers, here are my best tips:
- In the Notes page, write what you want to say for each slide, then create the slide. In 20 seconds, you can say 2-4 sentences.
- When your slides are done, run through them in Normal view so you can see the Notes pane or use Presenter view to read the notes. As you speak, quickly note which slides have too much or too little text. If it’s too little, you’ll be finished before the slide changes and have too much silence. If you have too much text, the slide will change before you finish speaking. In some cases, silence is good. If you’re showing your art, you want people to have some silent time to look at it.
- Adjust each slide’s text until it’s all the right length.
- For each slide, come up with an additional optional comment — a few words — that you can add if you speak too quickly. In other words, build some flexibility into your talk.
- One speaker showed a series of slides, usually 3-4, that related to one topic and spoke throughout that time without regard to when the slides changed. This gave him more flexibility. These were snapshots of people and as the slides changed, he told the story of those people. This worked well.
- Most people weren’t experienced presenters and they stood behind a lectern (I think it was actually a music stand) and read their notes. Having something between you and the audience is really an obstacle to communication. This is a small town where so many people know each other and the audience was very favorably inclined to all of the speakers. But in general, you should come out from behind the lectern and speak without notes. After all, the presentation is just 6 minutes, 40 seconds long!
- To get it right, you have to practice many times. There isn’t much room for error. My arc of feelings went from “I’ll never get this right” after 5 practices to “It’s getting there; maybe it will be OK” after 10 practices to “I’m starting to feel good about this” after 15 practices.
In the end, it went without a hitch!
Have you done a Pecha Kucha presentation or its sister, Ignite? What was your experience?
Need training? Click here to find out about training to bring your presentations to the next level!
Related posts:
Many times, you want to animate several slide objects. Rather than select each of them individually and then animate them, you can select themall together as a group and animate them. You may also want to rotate a few shapes placed next to each other to a certain angle, at times likethese, you'll be happy to know that grouping, ungrouping, and regrouping shapes makes it simpler and quicker to do these tasks inPowerPoint 2011 for Mac:
Grouping is the process of making a single selection of a disparate or similar set of slide objects, so that when you select itagain, you end up selecting the entire group rather than a single object. A group has a single set of selection and rotation handles (comparethe individual elements on the left of Figure 1 to the unified, single group on the right).
Figure 1: Individual shapes (left) and the same shapes within a group (right)
Ungrouping lets you break up a group of slide objects back into individual slide objects. If you were to ungroup the object tothe right of Figure 1 (see above), it would result in looking again as the one shown towards the left.
Regrouping: Sometimes, you need to ungroup an object just so that you can make one small change to a particular slide object.Regrouping remembers whatever comprised the original group, and reconstitutes the original group without the need of selecting all individual slideobjects again.
Grouping Shapes
Follow these steps to group shapes (or any other slide objects) in PowerPoint 2011 for Mac:
- Select the shapes you want to group.
- Right click the selection carefully, and choose GroupingGroup from the resultant menu, as shown inFigure 2. You can also group shapes by pressing the Alt + Command + Gshortcut key combination.
Figure 2: Grouping shapes- Alternatively, you can access the Home tab of theRibbon. Then click the Arrange button to bring up the drop-downgallery as shown in Figure 3. In this resultant gallery, select the Group option.
Figure 3: Group option within the Arrange drop-down gallery- Once the shapes are grouped, you can change their attributes as if they constitute a single slide object. For example, if you rotatea group, all individual objects in that group will rotate togetheras a single object.
- Look at the example towards the left in Figure 4, where you can see all four shapes selected androtated individually 15 degrees each (compare with the unrotatedstage in Figure 1). On the other hand, the grouped shapes on the right (containing the same shapes, but grouped) were also rotatedby 15 degrees, you can see that the rotation on the right looks much better.
Figure 4: Rotation of 15 degrees applied to individual shapes (on the left) and a group of same shapes (on the right)
Ungrouping Shapes
Follow these steps to ungroup previously grouped shapes and / or other slide objects in PowerPoint 2011 for Mac:
- Select the group you want to ungroup, and right click to get the resultant menu shown in Figure 5. Choose theGroupingUngroup option. You can also ungroup shapes by pressing the Alt +Shift + Command + G shortcut key combination. In addition, you'll also find theUngroup option on the Home tab of the Ribbon. Click the Arrange button to bringup a gallery that contains the Ungroup option (refer to Figure 3).
Figure 5: Ungroup option selected
Regrouping Shapes
Follow these steps to regroup (reconstitute) any hitherto ungrouped group:
- Select any one of the shapes which were ungrouped earlier. Right click carefully and choose GroupingRegroupfrom the resultant menu, as shown in Figure 6. The shortcut key for Regrouping is Alt +Command + J. In addition, you'll also find the Regroup option on the Hometab of the Ribbon. Click the Arrange button to bring up a gallery that contains the Regroup option (refer toFigure 3).
Figure 6: Regroup to reconstitute your ungrouped group- Save your presentation often.